Latest: Tutorials


Tuesday 11 March 2014

Devil's workshop Template for Blogger

0 comments
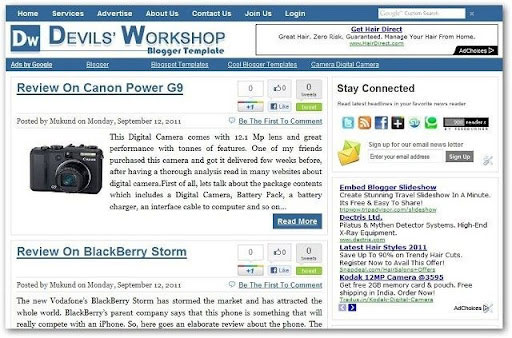
Hello, am sharing with you my second template on this blog, every template mentioned here in is SEO friendly and adsense widgets.This template is by default SEO friendly, and very fast to load in all browsers. The template is also Adsense ready and you can insert Adsense ads on the most important places of your blog such as in the header and below the post titles. It is a two column template and has a beautiful navigation bar which can be easily customized. Social buttons at left side of every post is the beauty of this design. Everything you need for your blog is included in this template.
Demo   Download
features of this template:
  • SEO Friendly by default 
  • Adsense Ready, banner space in the header and ad unit space below post titles
  • Super fast to load in every browser
  • Beautiful navigation bar
  • Stay connected widget for all of your social & subscription links
  • Cool Sidebar of width 300 Pixels
  • Social Buttons with every blog post
  • Read More option on posts, on home page
  • Empty space for picture logo

How to Install & Modify Blogger Template in Urdu?

For installing a blogger template you need to follow these steps:
  • Go to Blogger dashboard >> Template
  • Just observe the “Backup/Restore” button at right top & Click that
  • You can upload your template and also you can download/backup your older template
  • Upload your template which you downloaded and click upload 
  • That’s all done, now view your blog
If you have any problem installing this, then let me know using the comment box below

Continue reading →

Download My Noblenaijablog free premium Template for blogger

2 comments
Everybody wants a good template for their blog and that's why you see many bloggers roaming around the internet surfing for the best template for their blog.But today's i will be giving you this free premium template that i also use for this blog.This template was not created by me nor by my agents but was given to me from a very close friend.

Home Page
Preview

Blogger Template Page Layout

Numbered Paging navigation
Number page navi

Features of MY BLogger Blog Template

This template has many useful features and potential. Following are some best features of this template:
  • User Friendly Interface 
  • SEO Friendly Design
  • Top Sticky Bar 
  • Easy Navigation Bar
  • Ad Space in Header 
  • Single Left Sidebar 
  • Social Widget
  • Threaded Comment Box
  • Related Post Widget etc
  • Stylish Threaded commenting system
  • Auto Highlight Author Comments
  • Supports Default and Threaded Comments
  • built-in Sticky-bar with "Close Button"
  • Multi-colored Popular Posts
  • Two (Left and Right) header widget area
  • Stylish Block-Quito With hover effect
  • Number Page navigation Widget
  • Breadcrumbs/pagination
  • Notification bar/sticky bar
  • Customized 404 not found page with search form
  • customized profile widget
  • jquery Read comment privacy widget with expand/collapse
  • Deference CSS heading style h3, h4 and h 5.
  • Jquery Read comment privacy box
                                              Demo      Download

Installation Process:

  • Go to Blogger Dashboard >> Locate your Blog
  • If you have more than one blog, Click on ‘More’ Options Drop Down menu
  • Click on Template.
  • Click on the Backup/Restore button on Top Right Corner
  • Click on Download Full Template button to ‘Backup’ your Old template for safety
  • Click the Browse button and locate a blogger template from your hard drive.
  • Click on the Upload Button.
  • You are done!

Customization guide:

Footer Logo:
  • Go to Blogger Dashboard >> Locate your Blog >> Template > Edit HTML Button
  • Search for the tag <!--footer logo starts-->
  • you will see code as shown below,
<img alt='' id='footer-logo' src='https://lh3.googleusercontent.com/-U9OJ2pkewKs/Uj49kZbbsbI/AAAAAAAAB3o/21rJge7bJNQ/h99/Logo-Footer.png'/>
  • You just need to Replace Red url with your footer logo..
AdSense below Post Title:
  • Go to Blogger Dashboard >> Locate your Blog >> Template >> Edit HTML Button
  • Search for the tag <!--Start Google AdSense—>
  • you will see code as shown below,
<!--Start Google AdSense-->
<div style='float:right;margin-left:15px'>
<div id='Google-AdSense' style='width:300px; margin:0 auto;'>
place Google AdSense code here
</div>             
</div> 
<!--Ends Google AdSense—>
  • Replace place Google AdSense code here with your Adsense Ad codes. (Dimensions: 336px X 280px)
404 Not found page template:
  1. Go To Blogger Dashboard >> Settings >> Search Preferences
  2. Click on Edit link next to : Custom Page Not Found
  3. Inside the box paste the code. (Included with main file)
  4. Click the Save changes  button and you are done.
Navigation menu:
  • Go to Layout > Edit HTML
  • Search for <!--nav starts-->
  • Just below  <!--nav starts—> you will see a long chain of code as shown below,
<!--nav starts-->
<ul id='nav'>
<li><a expr:href='data:blog.homepageUrl'>Home</a></li>
<li><a href='#'>Menu</a></li>
<li><a href='#’>Archive</a></li>
<li><a href='#’>Comments</a></li>
<li class=''><a href='#'>Menu &gt;&gt;</a>
<ul>
<li><a href='#'>Sub Menu</a></li>
<li class=''><a href='#'>Sub Menu &gt;&gt;</a>
<ul>
<li><a href='#'>Dropdown Menu 1</a></li>
<li><a href='#'>Dropdown Menu 2</a></li>
<li><a href='#'>Dropdown Menu 3</a></li>
<li><a href='#'>Dropdown Menu 4</a></li>
</ul>
<i/></li>
<li><a href='#'>Sub Menu</a></li>
</ul>
<i/></li>
<li><a href='#’>Error 404</a></li>
</ul>
<!--nav ends—>
Edit bolded the hash sign (#) with your Page Links and Bolded Green Text with your Page Titles.
Sub nave menu:
  1. Go to Layout >> Edit HTML
  2. Search for <!--subnav starts-->
  3. Just below <!--subnav starts--> you will see a long chain of code as shown below,
<!--subnav starts-->
     <ul id='subnav'> 
<li><a expr:href='data:blog.homepageUrl'>Home</a></li>
<li><a href='#'>About</a></li>
<li><a href='#'>Contact Us</a></li>
<li><a href='#'>Sitemap</a></li>
<li><a href='#'>Write For Us</a></li>
</ul>
<!--subnav ends—>
Again replace the hash sign (#) with your Page Links and Bolded Green Text with your Page Titles.
Footer menu:
  1. Go to Layout >> Edit HTML
  2. Search for <!--nav-alt starts—>
  3. Just below you will see a long chain of code as shown below,
<!--nav-alt starts-->
<ul class='pad fix' id='nav-alt'>
<li><a expr:href='data:blog.homepageUrl'>Home</a></li>
<li><a href='#'>About</a></li>
<li><a href='#'>Contact Us</a></li>
<li><a href='#'>Sitemap</a></li>
<li><a href='#'>Write For Us</a></li>
</ul>
<!--nav-alt ends—>
Again replace the hash sign (#) with your Page Links and Bolded Green Text with your Page Titles.
Footer Social follows:
  • Go to Blogger Dashboard >> Locate your Blog >> Template >> Edit HTML Button
  • Search for the tag <!--mbb-follow starts--> 
<!--mbb-follow starts-->
<div id='mbb-follow' style='width:275px;margin:0 auto; border:none!important;'>
<a class='facebook' href='#' rel='nofollow' title='Facebook'>Facebook</a>
<a class='twitter' href='#' rel='nofollow' title='Twitter'>Twitter</a>
<a class='gplus' href='#' rel='nofollow' title='Google Plus'>Google Plus</a>
<a class='rss' href='#' rel='nofollow' title='Subscribe To RSS'>Subscribe To RSS</a>
<a class='tube' href='#' rel='nofollow' title='YouTube'>YouTube</a></div>
<!--mbb-follow ends—>
Replace the Bolded Green hash sign (#) with your Facebook Links.
  • Replace the Bolded Green hash sign (#) with your Twitter Links.
  • Replace the Bolded Maroon hash sign (#) with your Google plus Links.
  • Replace the Bolded Blue hash sign (#) with your RSS Links.
  • Replace the Bolded Purple  hash sign (#) with your YouTube Links.

Note:If you have any problem installing this template then ,let me know using the comment box below
Continue reading →

How to Upload a template on Blogger Blog

0 comments
Hello friends, my today's post is how to upload a template with simple methods on a blogger blog.Actually, new bloggers are finding it stressful on how to go with these process but to candid enough try and use this post as a process and see if it surely works and easier for you.

 First Step
Download your favourite template, always come with Zip file so you need to unzip(XML) the template before making it uploaded to your marked blog.

Second Step
Am sure you now know where your template path leads to on your blogger blog, if not let me make it simple for you..Log in to your account blogger.com..You will this image
Click on Your Blog Name
Click on a drop down menu near the third screen image above, then you will see this image
Click on Template
Click on template, you will be directed to another page where you either need to customize your already template or Editing the HTML.Anyway we are not dealing with that, just look above and you will this image again.
Click on Backup Restore button
Click on Backup/Restore
This only help you to have a copy of your content, images, or comment in case you come with any problem.You will directed to another page which looks like this;
Backup Restore Template

Oh you getting to the last stage. click on download full template as i explained before in order to get a copy of you content, images or comments.

Browse your template on your computer and click on the template you have already downloaded and extract to XML document.I think we are at the final stage, you will be re-directed to blogger again, in this case click on upload.

Now you can finally see your blog with gorgeous template.

Note:If you have not extract your template to XML document, then you wont be able to upload it because Blog is made of XML.

If you find any problem doing this, then let me know using the comment box below
Continue reading →
Blogger Widgets
 

Contact Form

Name

Email *

Message *

Jquery Dropdown Menu

Author's Bio

Founder & Author: Oyejobi Adeola is a blog designer, web developer and a loving person currently working on several web projects, he is managing several blogs from his living.He loves to help and teaches different people on how they can make it big online without age barrier.Do you really love his blog? If yes, then
Read More About Him

Recipes

Related Posts Plugin for WordPress, Blogger...
Copyright © 2013 Noblenaijablog All Right Reserved
Designed by oyejobiA | Powered by Blogger